Ultimate Guide: Golf Cart Battery Troubleshooting and Maintenance
Batteries are obviously pretty important on your golf cart. Whether you have a gas or electric, Yamaha, E-Z-GO, or Club Car golf cart, it won’t be very useful if the battery fails. Obviously, for electric golf carts, the battery is what provides power to your motor. If your batteries start to quit on you, the golf cart won’t move, or will drastically decrease in range.
With a gas motor, the battery is what starts the motor and keeps it running by providing electricity to the spark plugs. Without it, your motor won’t crank.
Such a vital part as a battery demands that you keep an eye on it, maintain it, and know how to fix things when they go bad. This handy dandy guide to battery maintenance and troubleshooting is designed to help you keep your golf cart batteries in good health to extend their lifespan, and save you some money on batteries and mechanics.
First let’s talk about what kind of battery is best for you
There are two basic types of batteries, lead-acid and lithium-ion. With lithium-ion batteries, there aren’t a whole lot of different categories, but lead-acid has two different main types: wet cell and VRLA.
Wet cell, or flooded batteries have a liquid solution that the battery metals sit in, and VRLA or valve regulated lead-acid batteries have an absorbed solution, or gelled solution.
Lithium-ion batteries have a lot of advantages, they’re lighter, charge faster, partial charges aren’t harmful to them, and they have a longer lifespan. However, they are really expensive to install, as your golf cart charger will most likely have to be replaced with one compatible to lithium-ion, and you may even have to make modifications to your cart for it to be able to run on lithium-ion batteries.
Lead-acid has a lot of advantages as well. They’re much cheaper, and are what your golf cart was most likely designed to use. This means less stress, hassle, and less upfront cost. As far as VRLA vs wet cell, there is a bit of give and take. Wet cell requires maintenance to reach its full lifespan, but is somewhat better at storage and can last longer than most VRLAs if taken proper care of.
VRLA batteries have no free liquids, so they are better for rough terrains, extreme temperatures, and don’t require maintenance, but are very sensitive to overcharging and a bit more expensive.
None of these batteries are inherently better than the rest in every way, so think about your needs and choose the battery that best fits your particular application. We’ve used the Trojan T-105 batteries for any deep cycle battery needs.
We used them for our RV cabin and love them for our golf carts.

of Callaway ERC Triple
Track Golf Balls for
yourself or your buddy!
Maintaining your golf cart battery
Now, before we talk about figuring out what’s wrong with your golf cart battery, let’s talk about how to keep things from going wrong for as long as possible.
This will hopefully save you some headache and money down the road by extending your golf cart batteries life to its fullest. Which brings us to the first part. You need a reasonable expectation of how long this battery will last you.
How long will a battery last?
Most batteries will last about as long as their warranty, haha. All joking aside, every battery is different, but most properly maintained batteries will last about 4 to 6 years depending on usage, charge cycle, and a bunch of uncontrollable variables. Lead acid batteries will require a lot of maintenance to do so, however.
No matter what type of battery you choose though, there are a couple things you need to do for every battery. We’ll start with those.
The never ending war on corrosion.
The most common thing that leads to early golf cart battery failure is corrosion. The problem goes deeper, too. It will ruin your cables, terminals, and even cause damage to battery trays and tie downs. Replacing a whole battery cable can be costly and difficult, so it’s best to avoid that problem.
Look for corrosion often, and neutralize it immediately. It’s a long and never ending war, but your wallet will thank you.
Corrosion happens when hydrogen gases, released from your battery, mix with other chemicals and gasses in the atmosphere, and then bond to the metals of cables, terminals, and battery posts. The corrosion looks like fuzzy blue/green stuff, similar to a mold colony that had a crazy lit party on your battery.
The corrosion is typically found on your cable terminals and battery posts, and as soon as you spot it, take steps to neutralize it as soon as possible. This is done in two steps.
-
Clean
First, you’ll want to clean off all of the corrosion. You’ll need corrosion cleaner and a stiff wire brush. You can get any type of battery cleaner in a store to perform this job, or you can use hot water and baking soda in a pinch.
Undo the terminals from the battery posts and soak the corroded area in the cleaner or baking soda solution for about 5 or so minutes, then put on some gloves, grab your wire brush, and keep scrubbing until it’s all gone. Repeat as necessary, then rinse with a lot of water.
-
Protect
Once everything is clean and corrosion free, it’s important to protect the area, they make a lot of different products for this, but the basic idea is to coat the cables, terminals, and posts in some sort of covering fluid that will protect it from gasses trying to bond with it.
Connect the terminals back to the post and then use your coating solution somewhat liberally to protect the area from future corrosion. You can use any store bought battery protection product you like, or just petroleum jelly, dielectric grease, or even bearing grease. As long as it will stay there and keep the metals insulated from the atmosphere.
Keep your battery clean
You battery’s performance can be hampered by more than just corrosion. Some batteries will form a puddle on top, seemingly without explanation, make sure to rinse these off. If your battery gets dirty, muddy, grimy, or anything else, make sure to clean that off too.
These things can cause extra resistance in your electrical system, putting an unnecessary drain on your battery and shortening its life.
The easiest way to do this is to just rinse the whole thing off with water, but if it’s really messy, and you have to take the cables off, it’s best to just do a full clean and protect while you’re at it. Gassing vents, electrolyte caps, terminals, and posts are the places that require the most attention.
Keeping your electrolyte levels up
Your battery works by having two metals, a cathode and anode, react to each other to create chemical energy that we harness as electrical energy. With wet cell lead-acid batteries, these metals are kept in a liquid electrolyte, a liquid solution comprised of pure water and hydrosulphuric acid mixed to a set specific gravity.
Other types of batteries typically use a gel, mat, or solid electrolyte to perform the same function. For the purpose of this topic however, the only battery we’ll be discussing is the traditional lead-acid battery, as this is the only type of battery for which you will have to worry about electrolyte levels.
Checking your electrolyte level is an important part of keeping your battery life healthy. The electrolyte is the liquid that the cathode and anode sit in. These two metals are usually bound to each other in a series of plates called cells. You should check your electrolyte level about every couple weeks or so.
There really is no consensus on how often to do it, but as long as it isn’t lower than it should be, you checked it soon enough.
To check your electrolyte level, make sure the area around your electrolyte cap is clean and pop that cap off. The plates should be fully submerged in the electrolyte, and it shouldn’t be too close to the top of the gas vent for each plate.
Most batteries will have a recommended fill line, so just use that. If your battery does not have a recommended fill line, then fill it up enough to cover the plates and maybe ¼ to ½ an inch more. As long as the plates are covered, it’s better to underfill than overfill if you aren’t sure. You can also use a filler with automatic shutoff so it doesn’t over fill.
All batteries will eventually die
No matter how well you do at your battery maintenance, batteries are a wearing part, meaning that they will eventually die. You can’t do anything to stop it. You can postpone it, but eventually the battery will lose too much capacity, or a cell will break or open, leading to total battery failure.
Hopefully, you kept up your maintenance and that battery will have lasted you for the 4-6 years you should have expected from it.
When your electrical golf cart is losing power too soon or shuttering on start, or when your gas powered golf cart is slow cranking or not starting at all, it may be time to consider a new battery.
Testing a battery
When your golf cart starts to show symptoms of battery failure, it’s important to do some testing before buying a whole new set of batteries. Besides, your batteries may be fine, and it could just be a bad connection, broken cable, failing motor or bad charger.
Before you spend $100+ on a new battery, make sure your old ones are actually failed out.
You’ll test batteries in a series of steps. This is very similar to most other diagnostic testing, with the same basic steps of confirmation, isolation, and test repair. In this case, your confirmation is making sure the problem isn’t something simple like a fuse, controller, or relay.
Before digging in, check all of the small components that are a part of this system.
Gas golf cart checklist
- Ignition switch
- Ignition fuse
- Starter relay
Electric golf cart checklist
- Key switch and connections
- Key switch fuse
- Solenoid
- Controller
If all of these relatively easy to check and replace parts are fine, then it’s time to dig into the wonderful world of battery testing.
Testing the battery pack as a unit
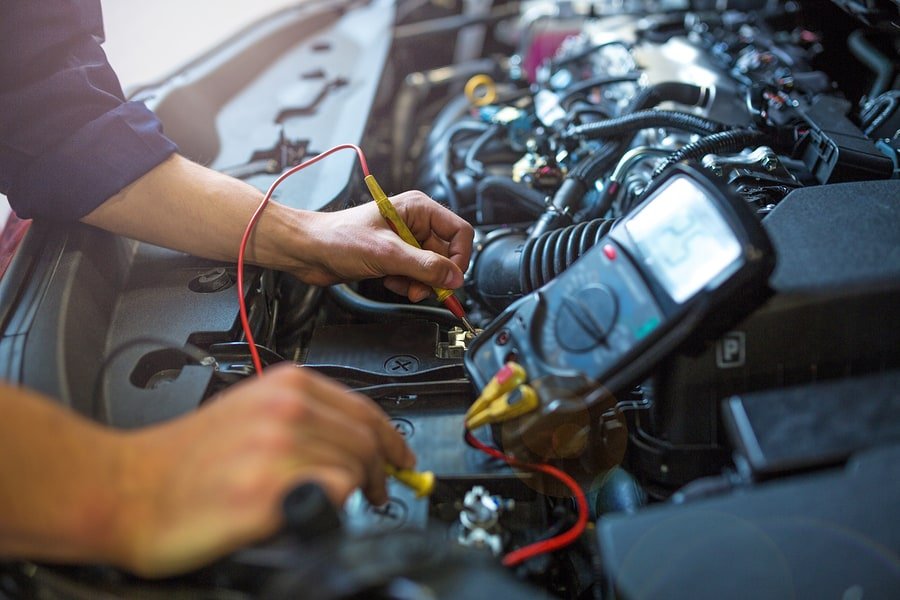
Your first step in this process is to test the battery pack for power. You’ll be checking if the motor or starter is receiving the amount of power it needs. To do this, you’ll disconnect the battery cable from the motor or starter and use a voltmeter connecting the positive to the cable, and the negative to a suitable ground with the accelerator or starter circuit engaged.
You should receive the total amount of voltage the battery pack provides if the battery system is operating correctly
If it passes this test, make sure to load test as well. This is done by using a circuit that puts a load on the batteries while you measure voltage drop. If the voltage drop is higher than the load tester calls for, or if it failed the first voltage test, then the problem is certainly on the battery side.
If your battery pack passed both these tests, it may be a poor connection to your starter/motor, a bad ground, or a failed motor/starter.
Isolating each battery
If you have determined that the failure is in the battery pack, it’s now time to start isolating the problem. This will be done by isolating each individual battery from the pack and voltage and load testing each battery separately. The hope is that only one or two batteries are bad and not the whole pack.
This will save you some time and money when it comes time to purchase new batteries.
Of course, if you only have one battery and you already did those tests to it, then you won’t have to do all of this, but you’ll still want to isolate the battery from the cart before testing it one final time. If it passes alone, then look at the subsection, “My batteries are all fine” to find out what to do next.
If you have more than one battery, you’re gonna start by either taking pictures or drawing a diagram of how the batteries are connected together. This is to help you put it back together correctly and avoid any horrible and costly mistakes during reassembly.
You’ll want to remove each battery from the pack. You can either do this one at a time and test them individually, saving a reassembly headache, or remove them all at once and save a little time if you’re sure on how to reassemble the pack. Either way, you want each battery completely separated from the golf cart.
Test each individual battery
After you’ve got your battery or batteries completely separated from the rest of the cart, you’ll start testing them each individually. The load test is a great way to be sure each battery is ok, but make sure the batteries are at least mostly charged.
When you hook up the load tester, it will give you a reading of voltage without load. Make sure this voltage matches the voltage of the battery. It should be just a little above whatever the voltage rating is for the battery.
If you’re missing almost exactly 2.2 volts from the voltage rating, you have a bad cell. If the voltage is correct, then activate the load. Do this to each battery.
You’ll probably find at least one battery that fails alone, make sure it is fully charged and give it another shot. Don’t stop with just one, though. Keep going until you have tested every battery in the pack. There could be more than one failure, by the way. Once you have all of your surely failed batteries, replace them, reassemble your pack, connect your motor, and charge up. Hopefully, everything should work!
But all my batteries passed!!!
If all your batteries passed, and you’re sure the fault is on the battery side of things, the next place to check is cables and terminals. Make sure each terminal is free of corrosion, and check each cable for resistance. You’ll start by isolating the cable, and then ,using an ohmmeter with a needle set on each terminal, you’ll compare the reading to the cable’s nominal resistance.
If your ohmmeter reads infinity or zero or significantly higher than the nominal resistance of the cable, the cable or terminal is failed. To find the nominal resistance of each cable, check this chart.
Make sure to replace any cables that are bad. Even if they kinda work, they’re robbing you of power and shortening the life of your batteries. Once you’ve replaced all the problems, your golf cart should be up and running again. Happy trails!